DTF Transfers: The Ultimate Guide to Direct-to-Film Printing
DTF transfers have rapidly become a cornerstone of modern apparel customization, offering speed, cost efficiency, and vibrant, wash-ready designs that endure through repeated wear and washing. For brands pursuing reliable results, direct-to-film printing enables artwork to be laid down on a PET film with CMYK inks and a white underbase, followed by adhesive powder and curing, before transfer to a wide range of fabrics and garment types. This introductory overview outlines the full workflow—from design and color management to powdering, curing, and heat pressing—so you can optimize consistency, forecast production timelines, and build a repeatable quality standard across runs. DTF transfers for apparel stand out for their versatility on cotton blends and dark fabrics, while a direct-to-film workflow emphasizes reliable DTF film quality, consistent white underbase behavior, and predictable adhesion under typical heat press conditions. In practical terms, you’ll compare DTF vs DTG to determine use cases, and you’ll consult heat press guidelines for DTF to ensure a strong bond, soft hand, and durable washfast graphics across varying fabrics, and as you scale you’ll refine your checks.
Exploring this film-based transfer approach yields alternative terms that SEO and LSIs favor, such as print-on-film technology, substrate-friendly garment decoration, and digital textile transfers that share the same core workflow. In practice, the process starts with printing a design onto a polyester film using CMYK inks and a white base when needed, followed by powder bonding, curing, and a precise heat press to apply the image to fabric. Compared with other textile decoration methods, this technique offers flexibility across fabrics, cost-effective small runs, and a scalable production path ideal for on-demand manufacturing. When planning projects, consider terms like garment printing on film, color management for film-based transfers, and heat pressing guidelines for consistent results.
DTF transfers for apparel: unlocking versatility with direct-to-film printing
DTF transfers for apparel empower brands to mix fabrics and run small batches without the extensive screens required by traditional screen printing. With direct-to-film printing, designs are created on a PET film using CMYK inks plus white when needed, then bonded to garments via heat and pressure. The result is vivid color, strong stretch, and a forgiving workflow that suits on-demand lines and limited editions.
High film quality and consistent powder adhesion are essential to maintain edge sharpness and color fidelity across runs. Selecting reliable DTF film, compatible inks, and proper white underbase strategies helps ensure that colors pop on darker fabrics and stay wash-fast over time. In practice, prepress and color management—calibration, test prints, and batch-tracking—drive repeatable results for DTF transfers for apparel.
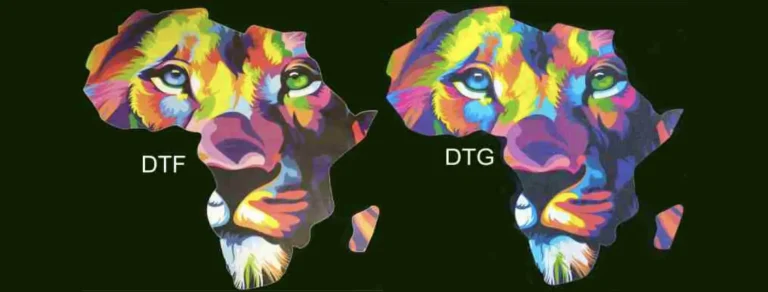
DTF vs DTG: choosing the right path with film quality and heat press guidelines for DTF
DTF transfers and DTG each have strengths, but results hinge on film quality, ink configuration, and fabric type. DTG can deliver soft hand on white or light fabrics, while DTF transfers often yield crisper whites and broader color range on dark garments thanks to white ink and powder adhesion. For mixed fabrics or darker colors, DTF transfers for apparel frequently offer more consistent outcomes across projects.
When comparing methods, also weigh heat press guidelines for DTF and overall workflow. Even, controlled pressure, correct temperatures (roughly 160–170°C / 320–340°F), and short pressing times are key to durable bonds. Understanding DTF film quality and choosing appropriate transfer media influence wash resistance and color longevity, helping you decide when to use DTF versus DTG.
Frequently Asked Questions
DTF transfers for apparel vs DTG: when is direct-to-film printing the right choice?
DTF transfers for apparel offer versatility across fabrics, bright color on dark garments, and cost efficiency for small runs. Compared with DTG, direct-to-film printing uses a printable PET film with white ink and bonding powder, enabling reliable results on cotton blends and dark fabrics with less pretreatment. DTG can deliver superb detail on 100% cotton but often requires pretreatments and higher setup costs. Choose DTF transfers for apparel when you work with mixed fabrics, on-demand small batches, or need crisp whites on dark fabrics.
How can I achieve higher-quality DTF transfers for apparel by focusing on DTF film quality and heat press guidelines for DTF?
Start with quality film and inks. Select a DTF film with consistent release, clear edge definition, and good transparency (strong DTF film quality). Use inks designed for DTF and plan a solid white underbase for dark fabrics. For pressing, set temperatures around 160–170°C (320–340°F), apply 8–15 seconds with even pressure, and use a brief pre-press to remove moisture. Choose hot or cool peel according to your film, and allow cooling before handling. Regular maintenance and test runs ensure wash-fast results aligned with heat press guidelines for DTF.
| Section | Key Points |
|---|---|
| What are DTF transfers? | Printed designs on a PET film using CMYK inks plus white, bonded to fabric with heat. They offer vibrant color, good stretch, and a forgiving workflow compared to traditional screen printing and DTG. |
| The core workflow (design to finish) | Design and color management; printing on DTF film; applying adhesive powder and curing; transferring to fabric with a heat press; finishing and care after cooling. |
| Why DTF transfers are strong for apparel | Versatility across fabrics; cost-effective for small runs; high color fidelity; soft hand feel and good stretch; relatively simple setup for scalable production. |
| DTF vs DTG: quick comparison | DTF often delivers crisper whites and broader color range on dark fabrics; broader fabric compatibility; potentially lower setup costs for small runs; durable, uniform feel. |
| Choosing the right film and inks | High-quality DTF film; durable, color-accurate inks; reliance on white ink and base layers; appropriate adhesive powder for clean release. |
| Prepress, design, and color management | Work with high-res files, plan white underbase, calibrate monitor/printer, run color targets, and manage layout and sizing for consistent results. |
| Pressing guidelines and finishing | Target temperature/time (e.g., 160–170°C for 8–15s), even pressure, pre-press to remove moisture, choose hot or cool peel per guidelines, and allow cooling for bond strength. |
| Care, maintenance, and troubleshooting | Follow wash care instructions, maintain equipment, and troubleshoot issues like underbase, color bleed, or adhesion with process adjustments. |
| Cost considerations and scalability | Material costs (film, inks, powder), labor/throughput, equipment depreciation, and strong quality control for repeatable results. |
| First steps for getting started | Define target fabrics/colors, source reliable materials, run test prints, document the process, and collect feedback for iteration. |