DTF transfers for beginners: building solid transfer skills
DTF transfers for beginners open the door to professional-looking custom apparel without the steep learning curve of other methods. If you’re new to direct-to-film transfers, you’ll be glad to know that with the right approach, you can achieve vibrant prints on T-shirts, hoodies, bags, and more, and you may be wondering how to make DTF transfers efficiently. This guide covers the basics, including the steps involved, and common pitfalls so you can start creating high-quality DTF transfers with confidence. Throughout the process, you’ll learn practical setup tips, material choices, and a repeatable workflow designed for consistency across projects. By following practical recommendations and keeping a simple mindset, beginners can move from curiosity to capable production.
As an alternative framing, this topic can be seen as an entry-level, film-to-fabric transfer workflow that emphasizes accessibility and steady results. In plain terms, you’re moving a digital design from film onto textiles using heat, pressure, and a bonding layer, with an eye toward repeatability. This reframing keeps the same goals—vibrant color, durable adhesion, and fabric compatibility—but speaks in beginner-friendly language that helps newcomers grasp the steps without jargon. As you progress, you’ll connect concepts like color management, substrate selection, and post-transfer care to broader topics such as printing basics and workflow optimization.
DTF transfers for beginners: A practical entry into direct-to-film printing
DTF transfers for beginners provide a practical gateway to professional-looking apparel without diving into complex equipment or procedures. Direct-to-film printing uses a clear transfer film, an adhesive or bonding powder, and a heat-press to move vibrant designs onto fabrics. Framing the process around the core concepts of DTF printing basics helps you understand color management, film compatibility, and predictable results, especially when you’re still learning the nuances of color fidelity and post-transfer care.
If you’re curious about how to make DTF transfers, start with a simple, repeatable workflow. From designing at a high resolution (300 DPI or higher) in RGB or CMYK, to mirroring where required and printing on the transfer film, you’ll move through bonding powder application, curing, trimming, and the heat-press transfer. This is a gentle transition into the steps involved in DTF transfers, and it’s a solid foundation for building confidence while experimenting with fabrics and colors.
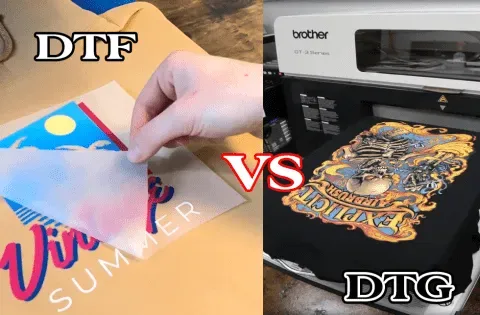
DTF vs DTG and mastering transfer reliability: from troubleshooting to best practices for durable prints
DTF vs DTG represents two different paths for decorating textiles, and understanding their strengths helps you choose the right method for your project. DTF tends to offer broader fabric compatibility, durable color reproduction, and flexibility for mixed runs, while DTG can excel on cotton with proper pre-treatment. When evaluating which route to take, consider your target garments, production volumes, and ongoing costs for inks and maintenance, as well as potential DTF transfer troubleshooting scenarios that arise with certain materials.
Embracing best practices for DTF transfers will boost consistency and longevity of your prints. Focus on standardizing your steps—test swatches, maintain clean workspaces, pre-press to remove moisture, cure bonding powder thoroughly, and document all settings. By adopting the recommended best practices for DTF transfers and staying aligned with DTF printing basics, you’ll reduce errors, improve wash-fastness, and build a reliable process you can scale from small projects to larger runs.
Frequently Asked Questions
DTF transfers for beginners: what are the essential steps to go from design to a finished garment?
Follow these beginner‑friendly steps aligned with DTF printing basics: 1) Design the artwork in RGB/CMYK at 300 DPI with high contrast; mirror if your printer requires it. 2) Print on the DTF transfer film using compatible inks and devices, ensuring balanced ink density. 3) Sprinkle an ultra‑fine bonding powder onto the wet print and let it set. 4) Cure the powder thoroughly to form a durable transfer film. 5) Trim excess film and clean the edges to prevent edge defects. 6) Pre‑press the garment to remove moisture and smooth wrinkles. 7) Align the transfer on the fabric and press at the recommended temperature, time, and pressure, covering with a protective sheet if advised. 8) Allow to cool, then peel as instructed by your system. For consistency, keep test swatches, follow color profiles, and document settings to ease troubleshooting later.
DTF vs DTG: for beginners, which method offers easier learning and broader fabric compatibility for DTF transfers?
Most beginners find DTF transfers more forgiving and versatile than DTG. Key points: Fabrics – DTF works on a wider range of fabrics (cotton, blends, synthetic), while DTG prefers cotton with pretreatment. Cost and maintenance – DTF generally requires less dedicated equipment and simpler upkeep. Learning curve – DTF workflows are repeatable across jobs and fabrics, making it easier to scale; DTG can demand more pretreatment, cure control, and maintenance. Use‑case – if you plan small runs across many fabric types, DTF transfers are a practical starting point; if you’re mainly printing on cotton apparel and are comfortable with pretreatment, DTG can be explored later.
| Topic | Key Points |
|---|---|
| What are DTF transfers and why they matter for beginners |
|
| DTF printing basics you should know |
|
| Getting the right setup as a beginner |
|
| Design and preparation in DTF transfers for beginners |
|
| Step-by-step workflow: from design to garment |
|
| Choosing the right settings and materials for beginners |
|
| Common issues beginners encounter and how to fix them |
|
| DTF transfers vs. DTG: a quick comparison for beginners |
|
| Best practices for DTF transfers that beginners should adopt |
|
| Frequently asked questions for new DTF users |
|
| Maintenance and care for ongoing success |
|
Summary
DTF transfers for beginnersopen a practical, creative door to custom apparel. With the right setup, basic design, and a repeatable workflow, you can achieve vibrant, durable prints on T-shirts, hoodies, bags, and more. This beginner-friendly guide shows you how to prepare artwork, select compatible materials, and follow a clear step-by-step process—from printing on film to curing powder and transferring to fabric—while avoiding common pitfalls. By practicing with small designs, testing color profiles, and documenting settings that work for different fabrics, you’ll build consistency and confidence. As you gain experience, you’ll optimize heat press settings, color management, and material choices to grow from hobbyist to small-run producer. DTF transfers for beginners can become a scalable and profitable skill when you stay organized, follow best practices, and continuously learn from each print.